Curling Rock FPP Pattern
One of the things my husband and I tried when we moved from Texas to Ohio was curling. Yes – the Olympic sport where you push large granite rocks down a sheet of ice. It turns out we really enjoy it and ended up joining a club here in Cleveland! We’ve just started our second season. As I do with anything I get excited about, I made a foundation paper piecing pattern.

I knew I wanted to make a skirt to wear while curling. I started these blocks in the middle of last curling season, but only barely got my skirt finished in time to wear to our end-of-season dinner.

I modeled the fit after a skirt I usually wear curling, and I’ve worn this one to several games already this year and it’s great for me to curl in. As a bonus, it’s a good conversation starter at bonspiels! I also made a pillow with these patterns to raffle off at one of our bonspiels last season, which I think was a big hit.

This pattern is now available in my craftsy shop in 12″ and 6″ sizes, but if you are also a curler I’m happy to send you the pattern in exchange for trading club pins! Email me at jmeigenbrodt@gmail.com
NEOMQG Ohio Star Quilt Block Tutorial
Every year, the modern quilt guild hosts a QuiltCon and encourages guilds to create a charity quilt with a specific color palette and theme. For QuiltCon 2018, the theme is modern traditionalism. The North East Ohio Modern Quilt Guild (NEOMQG) is making a modern quilt made up of many traditional Ohio Star quilt blocks. How cool is it that the state of Ohio has its own quilt block?!

While most traditional Ohio star quilt blocks only have 2 or 3 colors, we’re using up to four colors per block. Here’s a quick tutorial for guild members (and anyone else wanting to make Ohio star blocks!) looking for guidance on putting them together.

If you’re making blocks for the NEOMQG QuiltCon 2018 charity quilt, we’ll be cutting fabric and you can either choose colors from your block according to our guidelines (provided separately) or we can put together packages of blocks with pre-chosen colors for you.
Each block requires squares cut in two different sizes: a larger square size for the hour glass sections and a smaller square size for the solid sections. Our quilt will have multiple sizes of blocks, so here’s a cutting diagram table for each of the block sizes we’re using:
| Finished Block Size | Small Square | Big Square |
| 3 | 1.5 | 2.75 |
| 6 | 2.5 | 3.75 |
| 9 | 3.5 | 4.75 |
| 12 | 4.5 | 5.75 |
| 18 | 6.5 | 7.75 |
All measurements are in inches. This table includes some margin in the larger squares for the hourglass blocks to be trimmed.
For each block, you’ll need 4 small squares and 1 large square color A, 2 large squares color B, 1 large square color C, and 1 small square color D.

Start by making your hourglass sections. You will need 4 larger squares (e.g. 3.75″ squares for the 6″ block): one of color A, two of color B, and one of color C. Pair up one of the color B squares with each of the color A and C squares, and sew them into half square triangle (HST) units. This should result in (4) HST units – two with A/B and two with B/C. Press each HST unit. If you either press all seams towards color B, or all seams away from color B, it will help you nest your seams and get accurate corners for the next step.

My preferred method of doing this is to mark a line on the front of my sewing machine 1/4″ to the left of the needle with washi tape, and then guide the corners of the HST along this line. You could also mark lines 1/4″ from the diagonal with an erasable pen or however you like to sew HSTs.
Now take one A/B HST and pair it with a B/C HST as shown below, making sure that the HST seams line up, but the color B pieces are not on top of each other. Sew along the diagonals opposite to the ones already sewn. Cut between the seams and press to end up with two hour glass units. Repeat with the other two HST units to get 4 hour glass units each with the B triangles across from each other. Press each hour glass unit.

Trim each hour glass unit to the size of the smaller squares for your block (e.g. 2.5″ square for the 6″ finished block). Using a quilting ruler (I love my Omnigrip rulers), you’ll want to line up the center point (1.25″ for the 2.5″ square) on the 4-way cross in the middle and make sure the top right corner as well as the right and top edges of the ruler at the edge of your finished block size (2.5″) line up with seams in your hour glass unit.

Layout the 4 hour glass units with the 5 solid squares as shown below.

Sew together the three squares in each row, then sew together the rows to get a completed Ohio Star block!
Ocean Waves Quilt
I love animals on fabric, especially in blues and greens. When my cousin had a baby last year and was going with an under the sea themed nursery, I did not have a hard time finding enough fabrics to use in a quilt and ended up with an unnecessarily large baby quilt. Because everyone loves baby photos, I’ll start with one of adorable baby Corbin.

Because I have a hard time with solids, I even used a really soft low volume wave print in the background (one of my favorites by my Houston friend Patty Sloniger!)

The pattern is Elizabeth Hartman’s New Wave Quilt, which is a free pattern available here. I used the full size listed in the pattern (around 51×55″) because I had to use all the cute prints, but it would be easy to adapt this pattern to other sizes and she has a pattern for purchase that walks you through doing that if you don’t want to do the quilt math yourself. It went together really easily, and I think looks more complicated than it really was. It’s a great pattern to showcase lots of fun prints.

I’m working on getting better at custom quilting. I like to match thread colors so it’s a bit hard to see, but you can kind of see loops following the white stripes and an echo and inner diamond in the color stripes. Also, those sharks are maybe my favorite guys in the whole quilt!

I used this fun fish print I’ve been hoarding for the back and I love how the colors and theme match perfectly!

The most nerve-wrecking part was writing on this label after everything was quilted. I tested out a bunch of markers, and ended up using Tulip Fabric Markers for the thick text and a Micron .03 Archival Ink Pen for the thin text.

I’ve loved seeing pictures of him on it occasionally, and hope it gets lots of use
Pi Day Paper Piecing!
It’s almost Pi day this year! If you’re not familiar with Pi day, let’s back up a second. Pi is the ratio of a circle’s circumference to its diameter, and has a value of 3.14. Some people like to celebrate ‘Pi day‘ on 3/14, or March 14th. Often, this involves eating delicious pies! This year, I’ve made a 4″ paper piecing pattern in the shape of the greek symbol pi to celebrate.

I added an embroidery smiley face to mine, too. The pattern will be free in my craftsy shop until after Pi day 2017, so if you want a fabric pi use it to celebrate as you wish. I’d love to see a pot holder or trivet for pies!

A couple years ago, I designed some pi fabric and made it into a dress. Some day I’d love to make some more pi(e) blocks out of the fruit pies and pizza from that fabric to go with this pattern!
Planets Dress
My latest dress could pass as another space-themed Mrs. Frizzle dress, like my Halloween costume from last year.

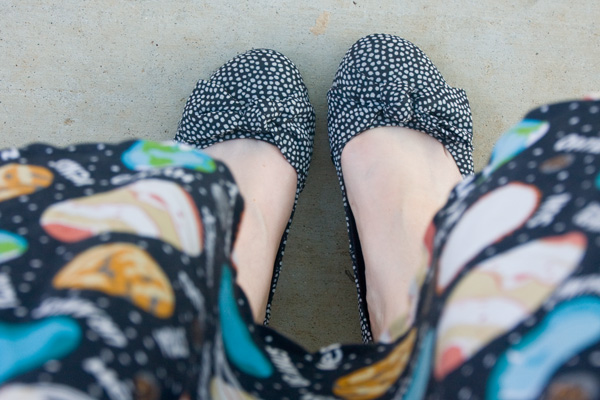
The fabric is my favorite. All the planets are there (including Pluto!) and the randomness of the pattern lends itself wonderfully to the circle skirt. Also, it GLOWS IN THE DARK. Seriously. It’s awesome. The fabric is from JoAnn’s, and my store still has some if you want to make something equally awesome with it.

And check out how wonderfully the contrast sleeve/collar (also, pockets) fabric goes with the main fabric. I went to the store looking for some solid black, but found this with polka dots in just the same scale/randomness as the stars on the main fabric. Plus, I love polka dots. Win-win.

This was my first attempt at pattern matching on the back of the bodice, and I think I killed it. Not only is it a 4-way pattern (not just stripes where you only have to line it up in one direction), but there are words on there. That you can read clearly across the zipper. If you can’t tell, I’m pretty pleased with myself.
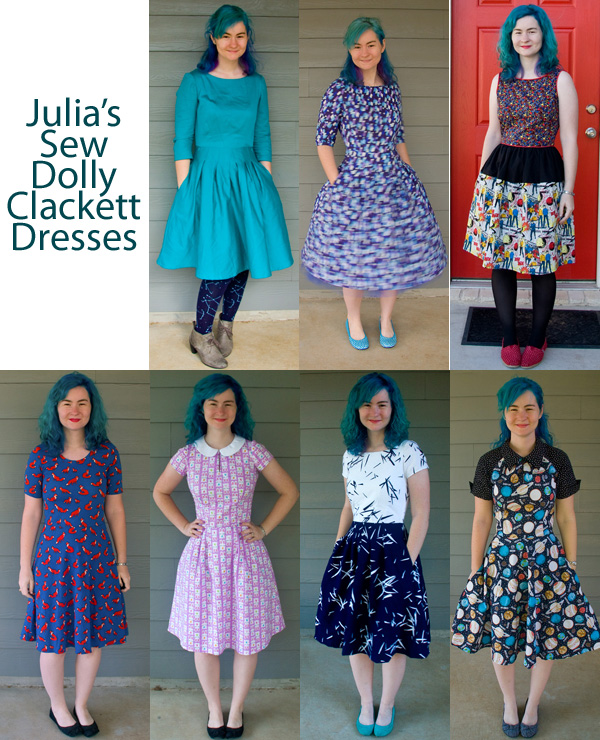
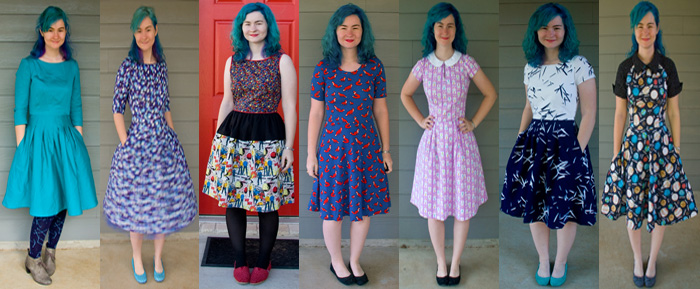
This was my last dress in a contest called Sew Dolly Clackett. Roisin, who blogs at Dolly Clackett and makes all of the most fantastic dresses, is getting married in about a month, and to celebrate a bunch of people made lots of awesome dresses emulating her style. Check out her ‘closet’ here. I’ve been hoarding fabric for dresses for quite a while, but this contest gave me the kick in the pants I needed to get started making them. In just over a month, I finished 7 dresses! I’ve actually finished another since then, too. I love them all <3. I’ll probably slow down on the dress making a bit, but I have plenty of plans for making more! Check out the flickr pool with over 200 dresses (I counted 228!) submitted here.
Pattern: I used Simplicity 1755. I like this pattern a lot – I think its cute, I like the sleeve detail at the cuffs, and there are no set in sleeves! I also really like the way the collar is put on. While I changed out the skirt pattern for a circle skirt, I really want to try out the skirt pattern. There are a ton of pleats, and they’re inserted so they cover up side and pocket seams. Even though my measurements indicated a size 12, I cut a size 10 and it fit well. I’ll probably make it again.

Pattern Changes: I skipped the lining and cut the bodice on the fold to avoid an extra seam. For the slit at the neck, I just used a bit of interfaced facing like this. I used hook and eye clasps instead of buttons at the front and back of the collar, and skipped buttons altogether on the sleeves because I liked how they stayed on their own. On the bodice, I just changed the arm scythes (up under the arm, in at the shoulders) and added an inch and a half to the length (I made a muslin to test those out). I skipped the skirt pattern entirely because I didn’t want my planets to get cut up in the pleats, and just cut a circle skirt as big as I could while fitting on the rest of the fabric I had left (if you’re curious, its a 61% circle skirt).


