Freezer Paper Stencils
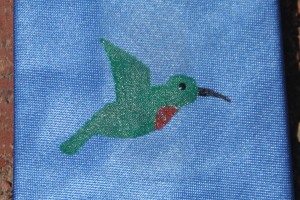
I’ve seen freezer paper stencils used on several of my favorite blogs, but had never tried it out before. For a project I’m working on, I had a really hard time finding any fabric that met my needs (a silky blue fabric with hummingbirds). Since its for my dad I knew he’d appreciate something even more handmade, even if it didn’t look professional. So I gave freezer paper stenciling a try – and it was super easy!

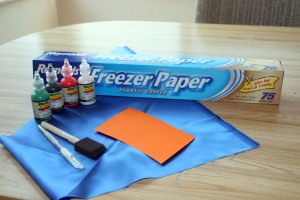
I used this tutorial from How About Orange, but I also have a few other tips/lessons learned for anyone else who wants to try this out – so I thought I’d post them here. The only materials needed are freezer paper (found along with saran wrap and aluminum foil at the grocery store), fabric paint, a small foam brush, and either a digital cutting tool (i.e. Cricut or Silhouette) or an exacto knife and cutting surface (block of wood or cutting mat). And fabric to paint on, of course.

The freezer paper was amazingly simple to iron on. I used a steam free setting on my iron, and all it needed was a few seconds to seal the freezer paper onto the fabric. Once I was done, it peeled off just as easily. There was generally no residue left on the fabric, but one time there was a thin white film left behind. Luckily (as this was on the final product and not one of my tests!), the white film scratched off with slight pressure from my thumbnail and didn’t harm the fabric. I also found out (after I was done cutting out and painting on three different stencils of the same hummingbird, of course) that the stencils are reusable and repositionable! If you don’t like how the stencil is positioned after you iron it down, you can just peel it off and try again!
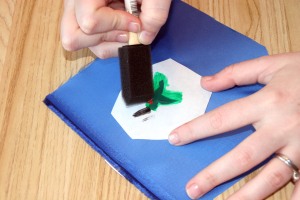
I had a hard time finding fabric paint in town, and ended up getting the puff paint you can find at joann’s and michaels. I was worried about how it would turn out on the fabric, but I just squeezed it out onto a piece of thick cardstock and brushed it on in a thin layer with my foam brush – which worked out surprisingly well. I only needed one foam brush – the fabric paint rinsed out easily in the sink between colors. I also had very good results with mixing colors. I know this is particular to the specific fabric I used (a satiny fabric from JoAnn’s – I’ll update this next time I go to JoAnn’s), but I had no problems with the paint bleeding through the fabric – I didn’t even need a cardboard layer underneath the paint.

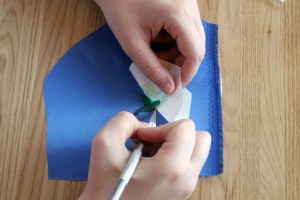
I used an exacto knife since I didn’t bring my Cricut out to New Mexico with me. Since this was such a small simple stencil that this wasn’t really a problem, but since I was trying to create three identical hummingbirds I stressed out a bit about cutting them all out the same. It would have been even easier if I had my cricut handy – I can’t wait to try out some really cool stencils when I get back home.
As you can tell, I used several colors. I only used one stencil, but found it really easy to just paint separately for the black beak and the green body. For the pink throat, I just waited until the green was dry and painted right on top. This did make the stencil a bit harder to remove (the paint was thicker and stuck to the stencil more), but I just used my exacto knife as I was peeling away the stencil and had no problems with peeling away the paint.

Can anyone guess what the final project is going to be? The picture at the top is the final project – the rest are just from a test on a fabric scrap. Full post on that coming soon 🙂
Shared at Craft-O-Maniac, Skip to my Lou, Sugar Bee Crafts, Running with Glitter, Today’s Creative Blog, Sew Much Ado, Blue Cricket Design, Trendy Treehouse, Sweet Peas and Bumblebees, Someday Crafts, Sumo’s Sweet Stuff, Somewhat Simple, The Shabby Chic Cottage, House of Hepworths, Fireflies and Jellybeans, Rhinestone Beagle, Tidy Mom, Creation Corner, At The Picket Fence, Fun To Craft, Shabby Nest, Fingerprints on the Fridge, Its a Hodgepodge Life, Finding Fabulous, Lovely Crafty Home, Simply Designing, Along for the Ride, Tatertots and Jello, Nifty Thrifty Things, I Heart Naptime, and The Girl Creative.


Thanks for sharing this at WorkShop Wednesday!
Beautiful job!
Thank you so much for linking this up to {nifty thrifty sunday} last week!
Hope to see you again this weekend!
xoxo,
Vanessa
I love freezer paper- so much to do with it! I would love it if you’d share this at my party this week called WorkShop Wednesday
Great tutorial. Thanks for linking up at last week’s party. Can’t wait to see what you have for this thursday’s party!
Looks lovely! Handmade is way better than store-bought, especially for a special person!
Thanks so much for sharing this neat project at Inspiration Friday this week!
Vanessa
thanks for the tips, i love freezer paper, but sometimes can be tricky!
xoxo
ash
jaysonandashley.blogspot.com/
I think you did a beautiful job! I bought some freezer paper ages ago to do some stenciling and keep forgetting to use it. Thanks for giving me some incentive to give it a try soon!